
I have used cast iron skillets for years. Love them! I have ones from my
mother (after they had gotten too heavy for her to use easily) and my
grandmother. I recently bought four 6-inch cast iron skillets at
World Market (I still want to call it Cost Plus). Unfortunately, they lack the
beauty and function of being seasoned and non-stick. Although over time,
if washed and used properly, they develop that rich beauty of
a well-seasoned cast iron! So, before I can use them, I want to
give them a pre-seasoning - and give them a good start in life!

Here is what they look like just purchased and after a good hand washing.
Its important to wash them first because the manufacturer often
puts a rust inhibitor on them. Ick! Lets wash that off!
As you can see in the pic, there is a little box of that bad
four-letter word L-A-R-D. It reads "Manteca" which is Spanish for "Lard".
(We have a lot of that here in SoCal.) I have many, many fond childhood
memories of foods using lard. Fried chicken, flour tortillas, refried
beans. Omg-ness! Yum! But yes unhealthy and I would never use
lard for anything but seasoning cast iron these days. You can also season
cast iron with Crisco shortening but I think good 'ole lard is still the best and cheapest!
 Give them a really good slathering of lard. On the insides, outsides, and on
the handles. I don't put it on the bottoms. I feel it isn't necessary
because the bottoms come in contact with the flame or direct heat source.
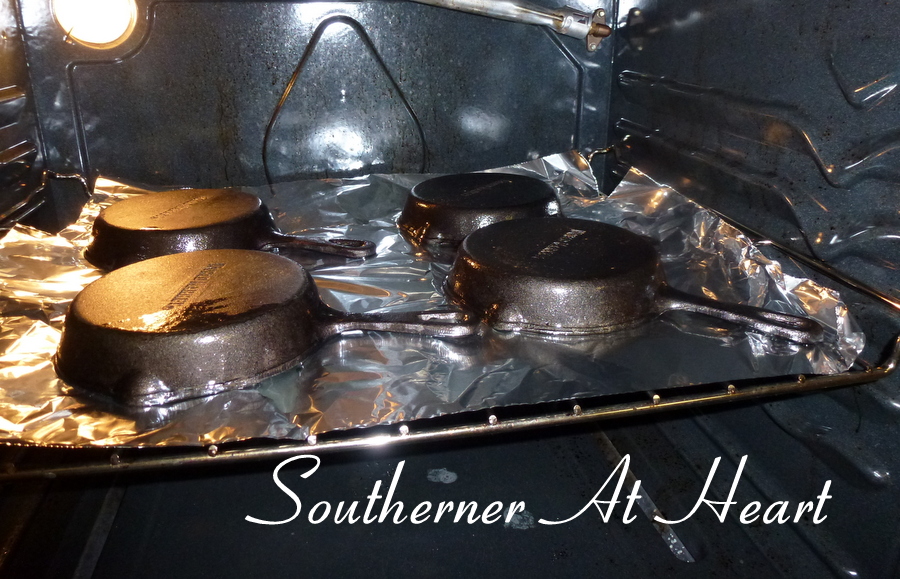
 I place them in a 200 degrees Fahrenheit oven, upside down, so any
melted lard won't pool and bake inside the skillet. I line my
baking rack with foil so any dripping, melted lard won't bake
onto my baking rack. I keep them baking in the oven for 3 hours
which allows for the lard to really bake into the pores of the
cast iron. After 3 hours, I turn the oven off. I like to do this
in the evening so I can allow them to cool down in the oven overnight.
 Here they are cooled down and out of the oven. Glistening and ready to
begin using. As they are used, remember NOT to use soap in them. You can
use a plastic scrubber (if you just have to!) but scrub gently so you don't scrub
off any seasoning. Always dry over a low flame/heat. As I use them a few
times, because these are so new, I will apply a light coating of lard with a
paper towel after they are dry but still hot on top of the flame. Let them
"cook" slightly (a minute or two!) on top of the flame, then lightly wipe
with a paper towel. This adds another small coating of seasoning.
Let them cool down before handling them to store them.
 Here I have returned them to the oven after been filled with my
grandmother's Tamale Pie as individual tabletop servings.
 Please re-visit me in a few days when I will be sharing her
Tamale Pie recipe with you along with a tablescape.
Thank you for visiting!
Fondly,
Karen
cast iron with Crisco shortening but I think good 'ole lard is still the best and cheapest!

the handles. I don't put it on the bottoms. I feel it isn't necessary
because the bottoms come in contact with the flame or direct heat source.
melted lard won't pool and bake inside the skillet. I line my
baking rack with foil so any dripping, melted lard won't bake
onto my baking rack. I keep them baking in the oven for 3 hours
which allows for the lard to really bake into the pores of the
cast iron. After 3 hours, I turn the oven off. I like to do this
in the evening so I can allow them to cool down in the oven overnight.

begin using. As they are used, remember NOT to use soap in them. You can
use a plastic scrubber (if you just have to!) but scrub gently so you don't scrub
off any seasoning. Always dry over a low flame/heat. As I use them a few
times, because these are so new, I will apply a light coating of lard with a
paper towel after they are dry but still hot on top of the flame. Let them
"cook" slightly (a minute or two!) on top of the flame, then lightly wipe
with a paper towel. This adds another small coating of seasoning.
Let them cool down before handling them to store them.

grandmother's Tamale Pie as individual tabletop servings.

Tamale Pie recipe with you along with a tablescape.
Thank you for visiting!
Fondly,
Karen
No comments:
Post a Comment