Showing posts with label Dinners. Show all posts

Friday, October 31, 2014

Whats for Dinner? One Pot Pasta

 What is One Pot Pasta?
Pasta and veggies all in a pot and cooking at the same time.
 A great dish to use leftover veggies with. 

You will want to begin by prepping all your ingredients:
chopping asparagus, slicing mushrooms, slivering garlic cloves,
and pinching off a sprig or two of fresh thyme.  
Shredded Parmesan will be added at the end along with some cream.
Tonight I have decided to serve along side hot and buttery french bread.


This buttery and baked hot bread by The Pioneer Woman which
she calls The Bread is French bread slathered on both sides 
with lots of butter then baked and finished under the broiler 
until dark brown and begins to burn.  That's right, 
she actually says, "... begins to burn." 

Once prepped and ready to go,


add all the veggies along with the dried pasta and water
to a stockpot along with salt and pepper.
 Bring to a boil and simmer, uncovered, until pasta is cooked
and vegies are tender.  Give the pasta a stir frequently so it does not
stick to itself. The liquid will actually reduce on its own.


  Parmesan is stirred in at the end, along with cream,
and Voila! it is done. Serve immediately with
some extra shredded Parmesan on the top
and that delicious hot bread!

Here is the recipe:

One Pot Pasta

1 lb. dried spaghetti
1 lb. mushrooms, sliced
1/2 lb. asparagus, cut diagonally in apx. 1" pieces
2 cloves garlic, cut into thin slivers
1 or 2 sprigs of thyme
4 1/2 cups water
Kosher salt and ground pepper, to taste
1/3 cup grated Parmesan cheese
1/4 cup heavy cream

In a large stockpot, add the dried spaghetti, mushrooms, asparagus, garlic, thyme sprigs, and water.  Season with salt and pepper.

Bring to boil, reduce heat to a simmer and let cook, uncovered, until pasta is cooked through and liquid has reduced, apx. 20  minutes.  Stir in Parmesan cheese and heavy cream. Serve immediately.

Adapted from recipe by Damn Delicious.

Enjoy!

I will be linking up with


Thanks for visiting!

Fondly,
~Karen

Friday, August 29, 2014

End of Summer Grilled Beef Skewers and Pineapple Salsa

 Here is a recipe that would be great for this Labor Day weekend.
It is made with Five-Spice powder. If you aren't familiar with
Five-Spice, it is used often in Chinese cuisine and consists of,
you guessed it, five spices: Star Anise, Cloves, Chinese Cinnamon,
Black pepper, and Fennel seeds. It can be purchased in the
spice aisle along with all the other spices.

I wanted to marinate beef in a Five-Spice marinade,
then skewer and grill the beef for dinner.  I was at Costco 
looking for flank steak or skirt steak that I could thinly slice 
for the skewers. I didn't have luck finding one of those two 
and had to settle on Flap Steak. 

Flap Steak is a thin cut of meat that comes from a bottom sirloin
butt cut of beef. It differs from Flank Steak because it comes from a more 
rear portion of the beef.  Likewise, Skirt Steak is even more forward then
then Flank Steak.  Flap Steak is sometimes confused with Hanger Steak
but it is not.  Both Hanger Steak and Skirt Steak are cut from the
diaphragm of the beef.  I think Flap Steak gets a bad wrap but I
have to admit it usually isn't my first choice either.
 
BUT as a thin piece of meat, it works beautifully
for skewers. It marinates nicely, and grills quickly.
The finished dish shows how thin the meat is.
I only cut it width-wise for the skewers.

The original five-spice marinade recipe came from 
 Better Homes and Gardens and the recipe I used as
modified can be found on BHG Delish Dish.
On this site, it is served with a yogurt sauce,
but I wanted to go even lighter and chose a pineapple salsa.
 
I, unfortunately, don't recall where this recipe for the pineapple 
salsa originated.  You can use these amounts listed in the recipe
below and at the end, give it a taste and make adjustments to
to your liking. The flavor improves as it sits in the refrigerator. 

This pineapple salsa is delicious and is also great as a side dish
for chicken or just served with tortilla chips (and a margarita!).
It's also great with these Five-Spice beef skewers.

Enjoy!

Pineapple Salsa
Source: Unknown
 
Serves 6

1 fresh pineapple, cored and diced
3 green onions, chopped
1 jalapeno pepper, seeded and diced
2 tablespoons chopped fresh cilantry
2 teaspoons fresh squeezed lime juice
1/2 teaspoon salt
1/2 teaspoon cumin

Combine. Cover and chill. 

Please join me as I link up with

Rattlebridge Farm's Foodie Fridays
 
 
Thank you for visiting my blog!

Fondly,
~Karen


Thursday, August 7, 2014

A Bird's Nest Napkin Fold and Dinner!


 Lucky me! 
Continued outdoor dining at my daughter's!
Previously, I enjoyed a lovely dinner on her balcony.
If you missed that post, you can check it out HERE
 

Tonight, dinner was originally for four but dwindled down to two.
That's okay. It happens... and it means more leftovers!


I like to include one or more wow-factors when entertaining
and often a napkin fold does just that.  I found this fun napkin 
fold in the shape of a bird's nest on You Tube HERE demonstrated
 by Denise Vivaldo. She has authored a book named 
"Top 100 step-by-step Napkin Folds." 

I decided to go with a bird theme and thought it coordinated
 well with this Morning Glories tablecloth and matching 
cloth napkins from Target.

My dinner for two began with an easy appetizer.


On a skewer, I added a cube of cantaloupe melon, a small fresh mozzarella
ball, and thinly sliced prosciutto.  I placed two each in margarita glasses,
drizzled each glass with a balsamic reduction sauce and chopped parsley.

The sweet melon goes beautifully with the Italian dry-cured ham
and the mozzarella ball has great texture and adds to the overall flavor.
They are pretty and were very nice to nosh on with a glass of wine.


For the entree, I made an Artichoke Chicken and Spinach Lasagna and served it
Basil Pesto Dressing that was really good.


Instead of a garlic bread traditionally served with lasagna, 
I tested a bread made with pizza dough stuffed with a soft herb
cheese, sprinkled with parmesan and topped with sliced zucchini 
and red onion.  You can find that recipe HERE.


Dessert was a wonderfully simple Lemon and Pistachio 
one-layer cake. Check back and I'll share the recipe with you.

I will be linking up with these following blog parties:

The Tablescaper's Seasonal Sundays
Between Naps on the Porch's Tablescape Thursdays 
Rattlebridge Farm's Foodie Fridays
 
 As always, thanks for visiting me!
 
Fondly,
~Karen


Saturday, July 19, 2014

Summer Balcony Dining and Fresh Strawberry Salad


 One of my favorite things to do is to eat outdoors.
On a recent summer evening, I enjoyed a lovely dinner at 
my daughter's on her balcony.  The weather was a beautiful 70-something.
Perfect for outdoor dining with a friend and family.


I made a centerpiece using store-bought flowers, combining 
them with sliced limes inside a square glass vase. You can see
I placed some of the discarded flower stems on the bottom of the
vase to help wedge in the limes (to avoid their tendency to float)
and to act as a floral frog to anchor in the flowers.
 
Our food picture taking was a little scarce, but I did want 
to share with you this delicious Fresh Strawberry Salad.

This fresh baby spinach salad included bleu cheese crumbles, 
thickly-sliced fresh strawberries, sliced red onion, and blanched 
slivered almonds. I dressed it with a White Balsamic Apple Vinaigrette.
I don't use a recipe, but a very similar one is this copy-cat
version of Panera Bread's White Balsamic Fuji Apple Vinaigrette.

 What a relaxing way to spend the evening... outside.

Where do you like to eat during the summer?

Thank you for visiting.

I will be linking up with these talented ladies' linky parties:


Fondly,
~Karen

Thursday, April 3, 2014

Whats for Dinner? Crock-Pot Chili with Chocolate

 
This chili with fool you!
Going into the crock-pot, it may seem like any ordinary chili.
 
 
It begins with black beans, kidney beans, and pinto beans,
along with cooked ground beef, tomatoes, onions, and spices.
It cooks for 6-8 hours... then for the last 15 minutes it
gets finished with chopped Chocolate - and just a tad of honey!
 
 
It's sure to please the most skeptical palate and would be fun to
serve guests, asking them what they think is the secret ingredient.
Its actually pretty tasty and delicious and, other than seeing the
sprinkling of shaved chocolate on the top for garnish, you would
never suspect there was chocolate in it.  The chocolate really is that subtle.
 
 
I made some seasoned saltine crackers to serve
along side. I often make these with chili flakes but for
tonight I left the spicy-ness off so we could get enjoy
the full spicy flavors of the chili.
 
Come on! Eating can be an adventure. Give this a try!
You can click on this link for the recipe for the
and here is the recipe for the crackers:
 
Seasoned Crackers
Source: Unknown
 
1 lb. unsalted saltine crackers
1 cup canola oil
1 (1 oz. pkg) ranch dressing mix
1/2 teaspoon garlic powder
2 tablespoons chili flakes (optional)

Line crackers on their ends in an air-tight container. In a small bowl, combine canola oil, ranch dressing mix, garlic powder and red pepper flakes. Stir until well combined. Spoon mixture evenly over crackers. Close the lid and gently flip over the crackers.  Flip over every 5 minutes for a total of 20 minutes.  There will be excess oil at first but as they get flipped they will absorb the oil.  The crackers can be stored in a ziploc bag and will last for about a week.

Enjoy and Thank you for visiting!
 
I will be sharing this recipe along with others at
Rattlebridge Farm's Foodie Friday
 
Fondly,
~Karen


Tuesday, February 25, 2014

What's for Dinner? Bleu Cheese Gnocchi

Here is a standby dish that is helpful for one of those days
when you've spent the day doing other things and hadn't
even thought about what to fix for dinner:  
Bleu Cheese Gnocchi with Spinach.
Anyone can work wonders with one of these in the pantry. 
This Gnocchi comes vacuummed-packed and is not refrigerated.
There are different brands and I have seen them at WalMart
as well as World Market.  They have a pretty long shelf
life which makes them a great item to keep in the pantry.
Once cooked, they are delicious tossed with fresh tomatoes, basil, and
olive oil or any other favorite sauce of your's.
 
I am making this gnocchi with bleu cheese and spinach.
I began by bringing a large pot of water to boiling.
I cook these packaged gnocchi the same as I do freshly made gnocchi:
I pour all gnocchi into the boiling water and they sink to the bottom.
Each piece of gnocchi will rise to the top when it is fully cooked.
 
While the gnocchi are in the boiling water, I spread the sour cream into
the bottom of the baking dish, then grate the parmesan evenly over that.
Once all the gnocchi have risen to the top, I add all the fresh baby
spinach, give it a quick stir, then immediately drain into a collander.
The gnocchi and wilted spinach is then added to the baking dish
on top of the sour cream/parmesan mixture...
 ...then stirred to fully combine.  The bleu cheese is now
crumbled over the top.  Tonight I used a a Stilton bleu cheese
because that is what I had in my refrigerator but any favorite bleu
cheese will work just fine.  The baking dish is now placed under the boiler
until hot and the bleu cheese is bubbly and golden brown.
 
This dish is very rich, very filling, and very delicious!
 
 
Bleu Cheese Gnocchi
Adapted/Converted from BBC Good Food Mag./October 2004
Serves 4
 
1 lb. gnocchi
one ready-bag of baby spinach
3 1/2 oz. sour cream
4 tablespoons grated parmesan
soft bleu cheese, crumbled
 
Cook the gnocchi in a pot of boiling water according to package directions.  They are done when they rise and float on the top of the water.  When all have risen to the top, plunge the spinach into the same water, then immediately drain through a colander and shake off any excess water.
 
Put the sour cream in a small baking dish with the grated parmesan cheese. Add the hot, drained gnocchi and spinach and give everything a good stir.  Crumble the bleu cheese over and season with ground pepper.
 
Slide the dish under the broiler until the cheese is bubbly and golden. Serve immediately.
 
Enjoy!
 
I will be joining
Rattlebridge Farm's Foodie Friday
 
Thank you for visiting!
 
Fondly,
~Karen


Thursday, February 13, 2014

Queen's Valentine's Dinner

Each year, a Valentine's Queen is elected in my sorority
chapter.  She is a gal who gives of herself her friendship,
is supportive, and is a gal we can look up to and see
a smiling face.  She is a true sorority sister in every way.
 
She gets to wear our chapter's coveted Queen's Crown...
...and a Queen's Valentine's Dinner is given in her honor.
 
Her dinner was given at a sorority sister's home the other night.
The sister hostess set a lovely table made the dinner. She asked me
to make the dessert.  Days prior, I asked our Queen what
her favorite dessert was.  She responded with "cupcakes".
The dinner was going to be a plated-sit down dinner so I opted for
Creme Brulee with dinner and Cupcakes saved for later in the evening.
The red and pink cupcakes rested beautifully on the piano while we ate dinner.
The Valentine's dinner began with festive salads plated
on the table when the sorority sisters arrived.
We each sat down with our choice of red or white wine
to a delicious entree of chicken, roasted potatoes, and green beans.
I made Creme Brulee in shallow ramekins garnished with
raspberries, mint, and a flourless-chocolate cake heart
cut-out and drizzled with chocolate.
 
Here is the evening's actual dinner menu:
 
Mixed Green Salad w/Beet-Infused Goat Cheese Hearts
Chicken Parmesan w/Marinara Sauce, Avocados, and Mozzarella Cheese
Roasted Red Potatoes
Steamed Haricots Verts
Creme Brulee w/Flourless Chocolate Cake Heart Garnish
Rose-Piped Vanilla Bean Cupcakes with Vanilla Buttercream
 
The dinner was delicious!
After a lively dinner, we settled into the livingroom, each exchanged
Valentines, then ate the cupcakes - leaving four for the
Queen to take home to her family.
 
It was a fun evening and one we all look forward to every year.
 
I hope you enjoyed this post and thank you for visiting!
 
I will be joining
Susan's Between Naps on the Porch for Tablescape Thursdays.
Feel free to go on over and check out all the tablescapes linked there.
 
Fondly,
~Karen
 

Sunday, January 5, 2014

What's for Dinner? Cornish Hens with Cornbread Stuffing

I had a couple of Cornish hens left in my freezer,
left from Christmas dinner when I roasted the
other hens for the non-red meat eaters in my family. 
 
In my continuing effort to cook through Ina Garten's cookbooks,
she has this recipe for Cornish Hens with Cornbread
Stuffing in her Barefoot Contessa At Home cookbook. 
baked the cornbread earlier in the day
to be used later in the evening when preparing dinner.

The cornbread stuffing is first made stove top
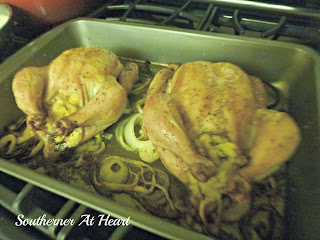
and the Cornish hens are prepped and set on
top of sliced yellow onions. 
The Cornish hens are then stuffed with the cornbread
stuffing, tied, and roasted.  Additional stuffing is
placed in a baking dish and baked separately. 
 After roasting for 50 minutes, they come out
juicy and tender - just as very young hens should.
The stuffing inside had just enough of the
juices to not be too soggy.  Delicious!
 
Here is the recipe taken from Ina's cookbook:
 
Cornish Hens with Cornbread Stuffing
Serves 6
 
For the stuffing
1/4 pound (1 stick) unsalted butter
1 cup chopped yellow onion
1 1/2 cups medium-diced celery (3 stalks)
3 tablespoons chopped fresh flat-leaf parsley
5 cups (13 ounces) coarsely crumbled cornbread
1/2 cup chicken stock, preferably homemade
 
For the hens
6 fresh Cornish hens (1 1/4 - 1 1/2 - pounds)
2 cups sliced yellow onions (2 onions)
kosher salt and freshly ground black pepper
2 tablespoons unsalted butter, melted
 
Preheat the oven to 400 degrees.
   For the stuffing, melt the butter in a medium sauté pan, add the onion, and cook over medium-low heat for 8 minutes, until translucent. Off the heat, add the celery, parsley, cornbread, and chicken stock and mix well. Set aside.
   For the hens, rinse them inside and out, removing any pin feathers, and pat the outsides dry. In a roasting pan that's just large enough to hold the hens loosely, first toss in the onions and then place the hens on top, breast side up. Sprinkle the insides of the hens with salt and pepper and loosely fill the cavities with the stuffing. (If there is stuffing left over, bake it in a separate pan until heated through.) Tie the legs of each hen together and tuck the wings under the bodies. brush with melted butter, sprinkle with salt and pepper, and roast for 50 to 60 minutes, until the skin is browned and the juices run clear when you cut between a leg and thigh. Remove from the oven, cover with aluminum foil, and allow to rest for 15 minutes. Serve a whole hen per person.
 
 What are you having for dinner tonight?

This week I will be joining


Thank you for dropping by.
 
Fondly,
~Karen

Saturday, November 23, 2013

Broccoli Chicken or Turkey Supreme

Dinner tonight is actually a recipe I want to share with you before
Thanksgiving because its such a great recipe for using
our leftover turkey after Thanksgiving. 
I first knew of Broccoli-Chicken Casserole because it
was the first dish my father learned to make after he retired
and my mother was still working.  He wanted to have dinner
ready for her! How sweet is that? (Miss you dad!)
But, I have to tell you, most of those recipes (including the
one my dad used) called for canned soup. 
 
I'm happy to say this recipe I'm sharing with you has NO canned
soup.  It is scratch-made using a cheese sauce and made with
crumbled (and buttered!) Ritz crackers for its topping...
I didn't say it was lower in fat!
 
Tonight I made this casserole with some leftover shredded chicken
breast that I had in the frig and had been needing wanting to use.
 
I broke up the fresh broccoli florets, leaving them on the
larger side, and then steamed them for 3 minutes.   
I placed them in the bottom of a greased
baking dish and sprinkled the shredded chicken over top.
 
The cheese sauce was then made by melting butter and adding
seasonings, milk, a little chicken broth, and a slurry of cornstarch and water.
It thickens beautifully then shredded cheddar cheese is added and
combined until melted and smooth.
This cheese sauce is now poured over the top of the chicken and broccoli
with more cheddar cheese sprinkled on top.
 
For the topping, I used Ritz' Roasted Vegetable crackers,
crushed them in a ziploc, again leaving pieces on the large side, then
added them to melted butter.  The topping was sprinkled
over the top of the casserole then baked. 
The recipe makes a 9x13 but I improvised and
made only an 8x8 because there was only two of us for dinner. 
I served it along side one of my favorite salads which includes
 dried cranberries, pecans, feta, ripened pear, and an unusual,
but tasty, dressing made by combining two different dressings.  Check
back in a day or two and I'll share that salad recipe with you as well.
 
This isn't the normal Broccoli-Chicken Casserole
and it certainly deserves the title of Supreme.
I hope you keep it in mind come Friday and you have
all your leftover turkey.
 
Here is the recipe: 
 
Broccoli Chicken Supreme
Makes a 9x13 baking dish.
 
Ingredients:
1 lb. fresh broccoli, broken into florets.
3 cups cooked chicken breasts, cubed or shredded
3 cups shredded cheddar cheese, divided
2 sleeves Ritz crackers
1 stick melted butter
 
Cheese sauce:
1/3 cup butter, melted
1/4 cup cornstarch, dissolved in 1/2 cup cold water
1/3 cup chicken broth
1/4 teaspoon salt
1/4 teaspoon pepper
2 cups milk
1/2 of the cheese listed above.
 
Directions:
Steam broccoli florets for 3 minutes.  Grease a 9x13 baking dish and layer the broccoli and the chicken.  Set aside. In a saucepan, combine the melted butter, cornstarch slurry, chicken broth, seasonings, and milk.  Stir with a whisk and continue whisking until sauce has thickened. Take pan off heat and add 1/2 of the cheddar cheese and whisk until melted and smooth.  Pour over the chicken and broccoli. Top with the remaining cheddar cheese.
 
Topping:
Crush the Ritz crackers in a ziploc.  Melt butter in a bowl and add the crushed crackers to combine.  Sprinkle topping over the top of the grated cheese.
 
Bake uncovered at 350 degrees for about 30 minutes or until hot and bubbly.  Cover with foil if topping is getting too browned before its done.  Let it sit and cool slightly before serving.
 
Enjoy!
Thank you for visiting!
 
I will be linking with
 
The Tablescaper's Seasonal Sundays
Stone Gable's On The Menu Mondays
Rattlebridge Farm's Foodie Friday
 
 
Fondly,
~ Karen


Related Posts Plugin for WordPress, Blogger...